
Look up and let the stars lift your spirits AND exoplanet targets for Unistellar eVscope users!
March 27, 2020
How I Plan to Help Save Science Education with the Unistellar eVscope!
October 2, 2020Dear Unistellar eVscope users,
With your Unistellar eVscope you have the technology to detect planets orbiting other stars. Think about this–over 30 years ago planets around other stars (exoplanets) were hypothesized, but none yet were detected. Since the most agreed upon “first detection” of an exoplanet in 1992 around a pulsar, astronomers have detected thousands of exoplanets, but this has been done mostly through the use of expensive remote telescopes and highly technical techniques. Now, you and your eVscope can observe exoplanets with a few clicks on your smartphone and some time.
I’ve been posting exoplanet targets for you and me to try and observe for the past few months. This is a pilot citizen science program for exoplanet detections that I am working on for my PhD. The eVscope had already proven successful in observing an exoplanet before I started my PhD work this year, however, we have been trying to improve upon its capabilities by experimenting with new settings. My colleague, Tom Esposito, a researcher with the SETI Institute, has been helping me with this project and he was successful in the observation of TESS TOI (target of interest) 656.01, a.k.a. WASP-43b with the new settings we developed. Check it out and great job Tom!
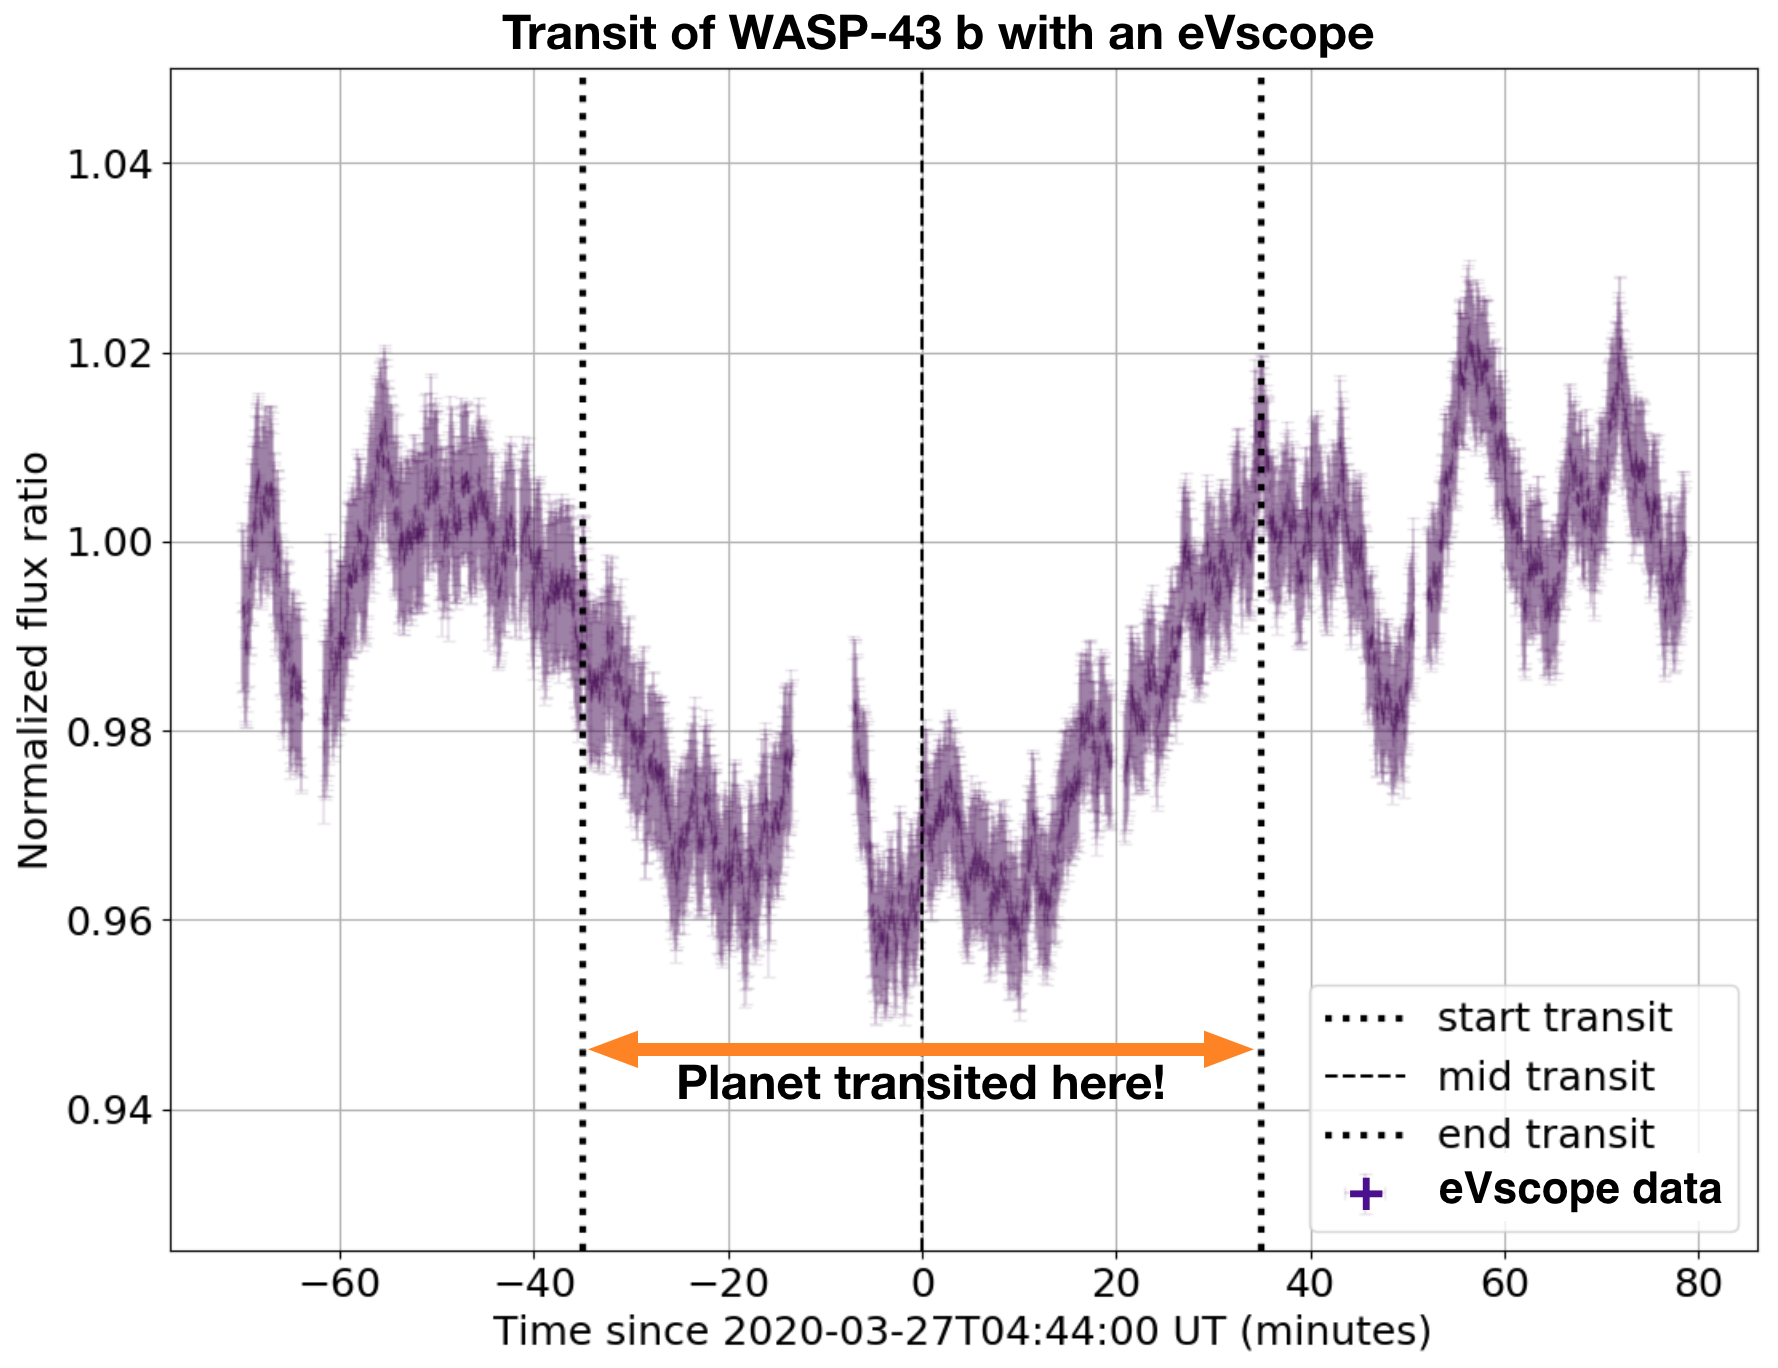
Figure 1. Detection of exoplanet, WASP-43b (TESS TOI 656.01) with a Unistellar eVscope. Observation taken from Richmond, California by Tom Esposito on 2020 March 27. Data analysis/figure also by Tom.
Figure 1 is an example “light curve” showing an exoplanet transit detection with an eVscope! On 2020 March 27, Tom observed the star WASP-43 and detected its planet “b”, which is a gas giant with about two times the mass of Jupiter and an orbital period of only 0.8 days. The observation was made from his semi-urban back yard in Richmond, CA, US (on San Francisco Bay; Bortle class 7/8) on a clear night over the course of ~3 hours. The transit occurred between the dotted vertical lines, where the flux (i.e., brightness) of WASP-43 decreased by about 3% compared to another nearby “reference” star while the planet blocked some of the starlight. This is a solid detection but the shown light curve is still preliminary (for example, we see artificial up-and-down wiggles due to the way we are measuring the fluxes of the stars in this analysis).
Exoplanet detections like this are what your observations this weekend are for! You too can get an exoplanet light curve to detect another planet and contribute to this amazing citizen science initiative. Check out the directions and targets below, if are able to help us observe this weekend.
Sincerely,
Dan
Unistellar eVscope Exoplanet Observing Directions Using Occultation Mode
Pre-Observation Directions
- To make sure that there is enough space on your eVscope to collect data, download any previous data on your phone, then connect to your WiFi and upload it to our server. See directions on this below, if you do not know how to do so. This can take >1 hour, so please allow enough time before the observation.
- Make sure to charge your eVscope so it has enough charge for at least 5 hours of observing.
- Review the suggested exoplanet transit observations provided. Pick the most convenient target for you, but keep in mind your local weather may affect your observing ability.
How do I download eVscope data and upload to the Unistellar Citizen Science server?
- To do this, connect to your Unistellar eVscope with the Unistellar app.
- Click on the “User” tab (person symbol). Give the app a moment to load.
- After it loads, click on “DOWNLOAD DATA”. Do not leave the app’s download screen and wait for it to finish. You will not be able to use your phone while the data is downloading. This should be several minutes to ~30 minutes depending on how much data you had to download.
- After the data successfully downloaded to your phone, disconnect phone from eVscope network, turn off eVscope, and connect your phone to your home high-speed WiFi network. Be sure that you are connected to a WiFi network during upload– otherwise, you will upload over the mobile network and use up a lot of mobile data.
- Lastly, select “UPLOAD DATA”. Note this may take several hours if your eVscope had a lot of data (>40%). It is suggested to allow your phone to upload while it is charging and you are sleeping. Should the upload not complete for any reason, you can try again without needing to re-download the data from the eVscope.
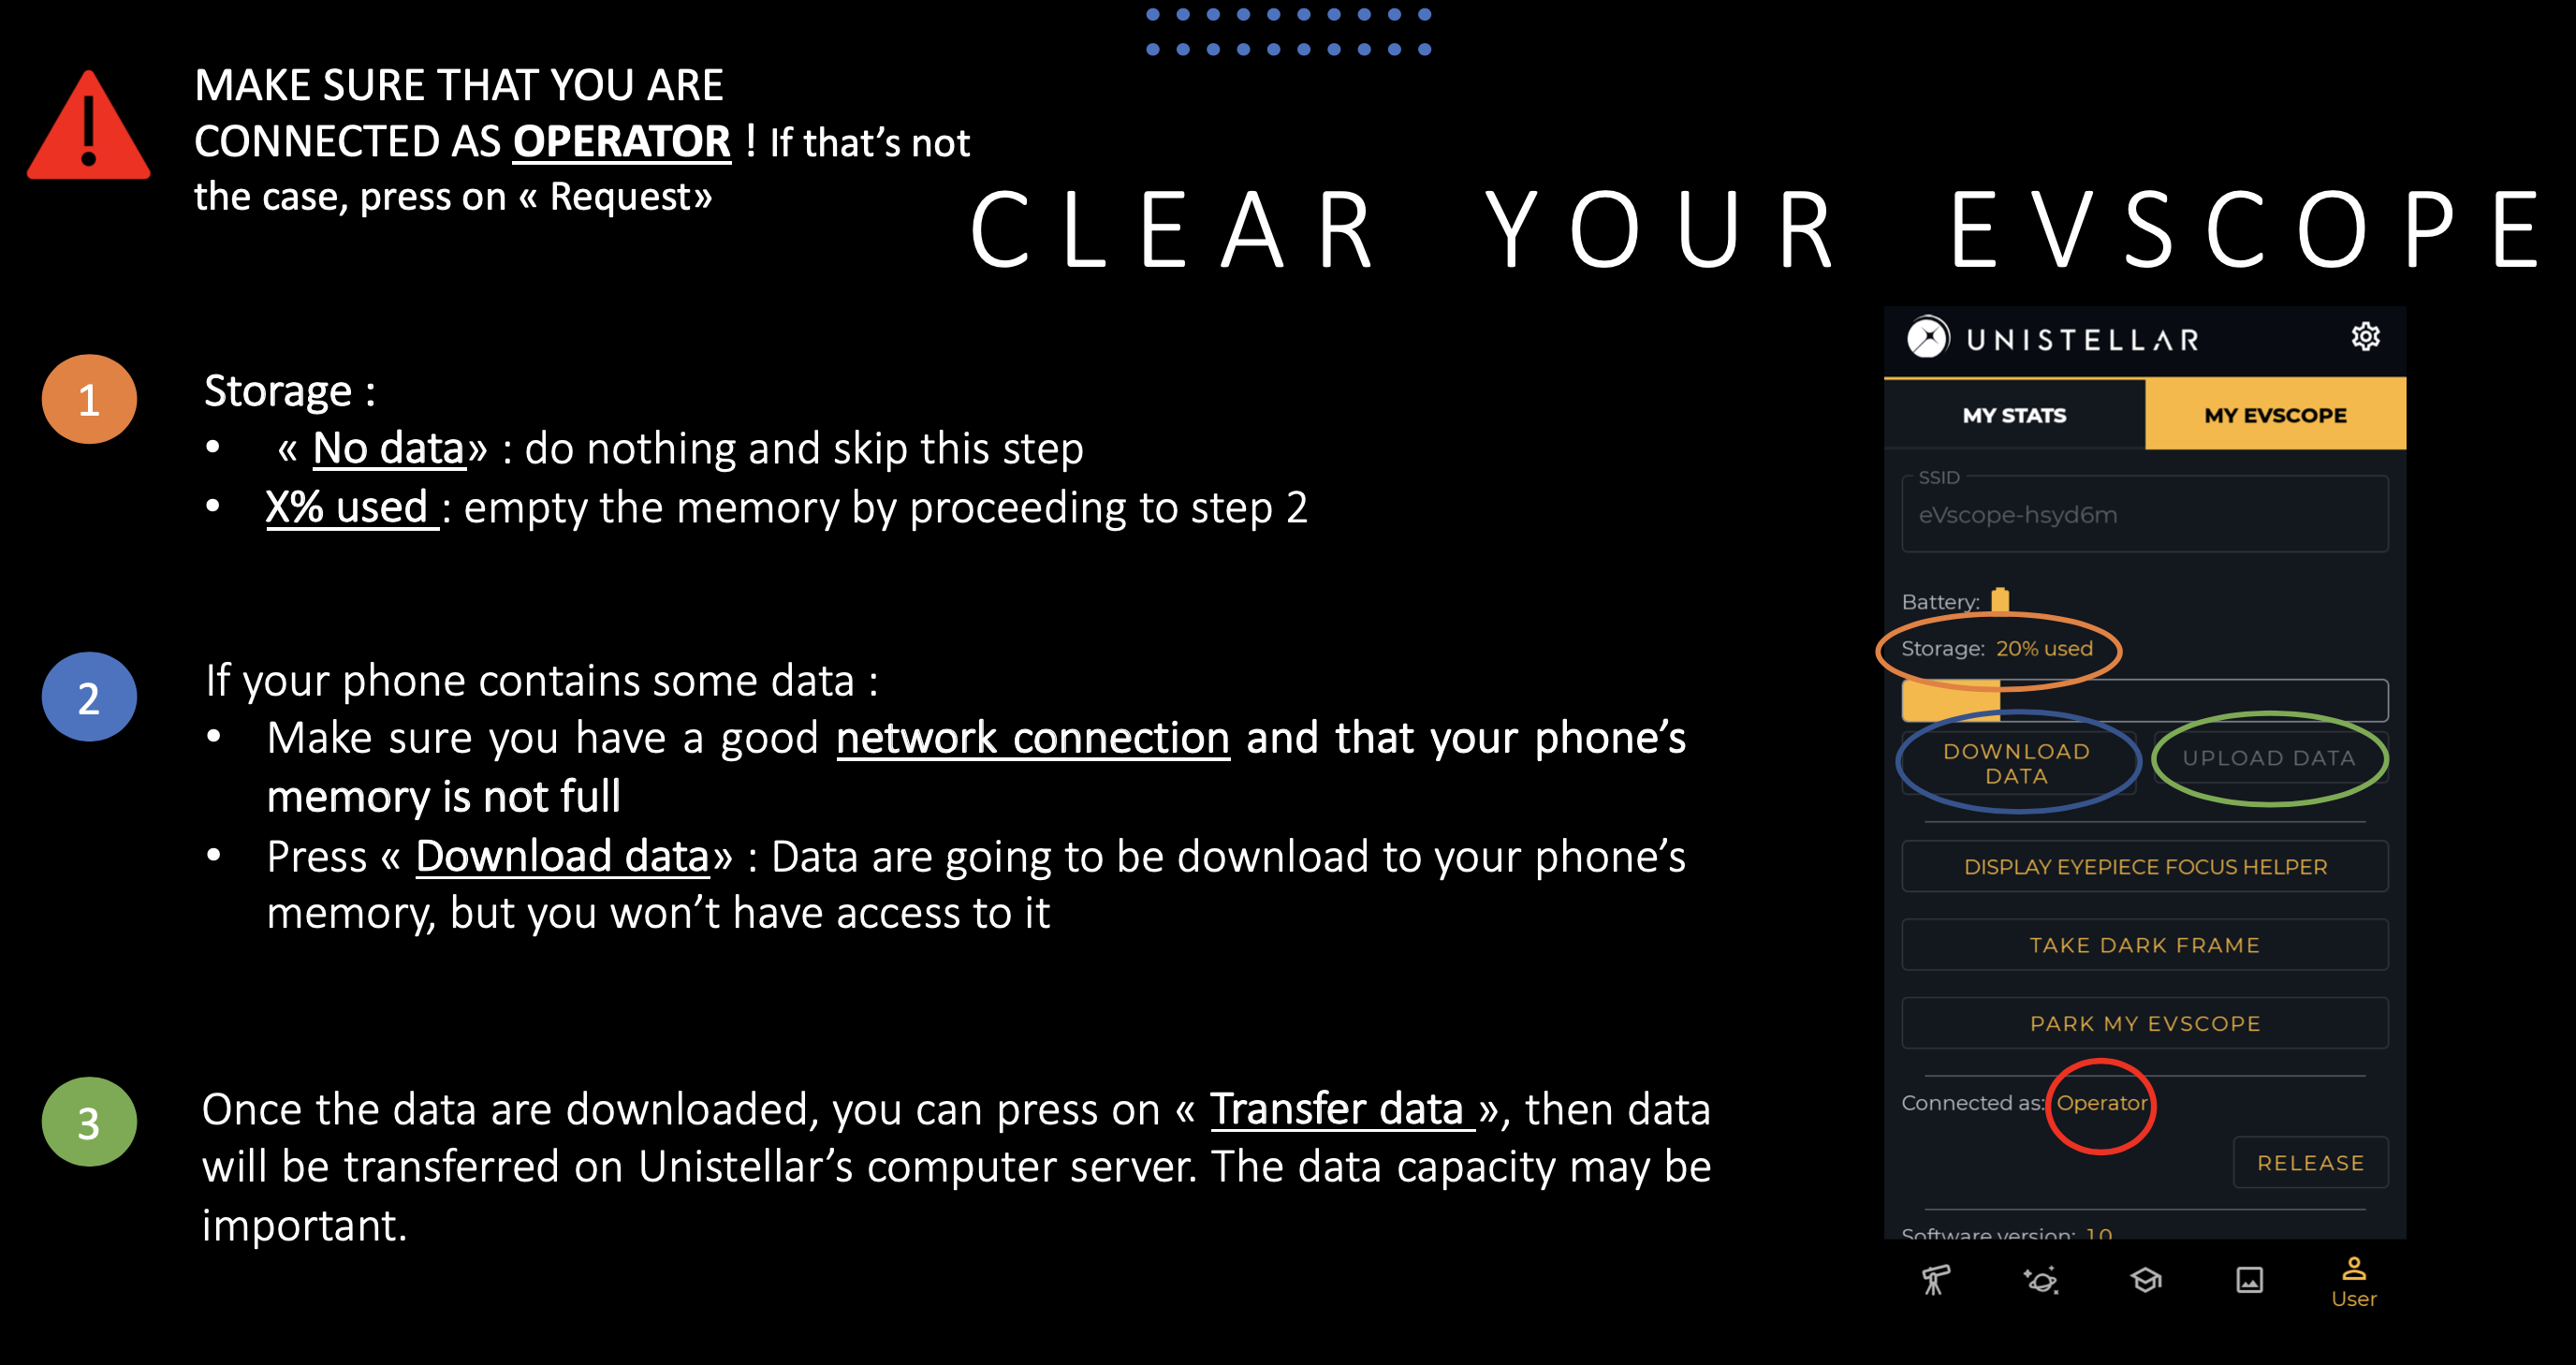
Visual Directions by Inès Demuys of Unistellar.
*Note: Future updates are in the works to improve this process and the time it takes to upload.
Observation Directions
- Set up your eVscope about 20 minutes before the observation start time. It is important that you uncap your telescope at least 10 minutes before an important observation so the mirror temperature can reach equilibrium to improve image quality and stability.
- After you connect to your eVscope point at some bright stars and focus the eVscope, and then auto-align. Make sure it says “alignment is successful”.
- After alignment, go to the “Science” tab (“graduation cap” symbol), then click on “Asteroid occultations”.
- At the top of the Asteroid occultations page, in the Target fields, enter your Ra and Dec (listed for each target in provided observation details). Double check your numbers and then hit the GOTO button.
- While your eVscope is finding the target, click on the eVscope tab (telescope symbol) to watch the telescope find the target. The app will alert you when it is done finding the target with the text “Goto finished”.
- If provided, compare your eVscope’s field of view (FOV) against the provided finder chart. You may need to mentally rotate the eVscope image, but the star pattern in your FOV should roughly match that of the finder chart.
- Take a screen shot of the field of view (FOV) and take a mental note about how the stars look on the screen (or refer back to the finder chart). You’ll need to check the FOV every 30 minutes during the observation to make sure your target is still centered.
- After completing steps 4 – 7, go back to the “Science” tab.
- ~5 minutes before start time, TAKE DARKS: In the “Recording” fields, change the “Exposure time” and “Gain” to the values given in your observation details. Put the lens cap back onto the eVscope. Set the “Duration” to “02min 00s” (2 minutes). Press the “LAUNCH” button to record your darks.
- Remove the lens cap after 2 minutes has passed and the recording has finished.
- Change the “Duration” to “30min 00s” (30 minutes) and make sure your exposure and gain settings are the same as for the darks and as given in the observation details.
- At the designated start time for your target, press the “LAUNCH” button to begin recording your exoplanet target. Set a timer on your watch or watch the clock to remind you to come back 30 minutes later.
- Feel free to go back to the “eVscope” tab to watch the live view of your data being taken.
- After the 30-minute recording has finished, check your FOV. Are the same stars visible in your FOV as when you started? (It is OK if the star pattern as rotated.) If so, then make sure your settings are the same (exposure, gain, and duration), and click on “LAUNCH” again.
- If and only if some stars have moved out of your FOV, then repeat the “Goto” process again with your Ra and Dec. This should be faster than the first time around. After that finishes, check to make sure your FOV matches your original (again, rotation is OK) and exposure and gain settings are correct. Then click on “LAUNCH” for another 30-minute recording.
- Repeat this process until your observation time ends. Note that you may have to adjust the time of your last block of recording based off of how much time is left towards the end. It is okay to set your duration a bit shorter or longer than 30 minutes for the last round.
- TAKE DARKS AGAIN: In the “Recording” fields, make sure the settings are the same. Put the lens cap back onto the eVscope to take your darks. Set the “Duration” to “02min 00s” (2 minutes). Press the “LAUNCH” button to record your darks.
- After your darks, you are done!
- Park your eVscope, turn it off, and celebrate because you are officially an exoplanet hunter!
Post-Observation Directions:
- Send us the data by downloading the data on your phone, then connecting to your WiFi and uploading it to our server (I recommend uploading the data while you sleep, so if you’re going to bed soon, it wouldn’t hurt to start this beforehand). Details on how to do this are in the pre-observation directions.
- Contact us by email at citizenscience@unistellaroptics.com to inform us that you observed. In your email, include the following:
- Your name
- Observing location (city, state/region, country and/or latitude & longitude)
- Name of target you observed
- The approximate local time when you took your dark frames
- Any important notes about the observation (e.g. it was really windy, some clouds, etc.)
- The eVscope SSID of your eVscope. This is the same letter/number code that appears on your phone when you are selecting your eVscope to connect to your phone via its broadcasted WiFi signal, and can also be found in the “User” tab in the box at the top titled “SSID”. E.g. eVscope-abc1d2.
Contact us by email at citizenscience@unistellaroptics.com if you have any questions and to let us know that you observed.
USA Target: Best viewed from western United States, but possible in the east.
Friday, April 10, 2020
Exoplanet Observation Details –> WASP-85 A b
Date of observation:
Friday, April 10, 2020
Observation Start/End Time:
9:03 pm – 1:52 am, Pacific Standard Time
*Hey, guess what? You don’t even have to be with your eVscope this entire time! I’ve done observations this long and after setting up went inside to catch up on my favorite show or enjoyed some reading.
IMPORTANT: PLEASE CHECK THE WEATHER so if you leave your eVscope out it is not damaged by rain/snow!!!
Target:
WASP-85 A
Additional details: V=10.7, Depth (ppt) = 18.7.
We hope to detect the exoplanet, WASP-85 A b
Celestial Coordinates:
Right Ascension (RA) –> 11:43:38.01
Declination (Dec) –> 06:33:49.4
Additional Target Information:
Constellation: Virgo
Direction: SE
Elevation at Start/Mid/End of Transit: 54°/59°/55°
eVscope Settings:
Exposure: 3950 ms
Gain: 14 db
FOV Finder Chart:
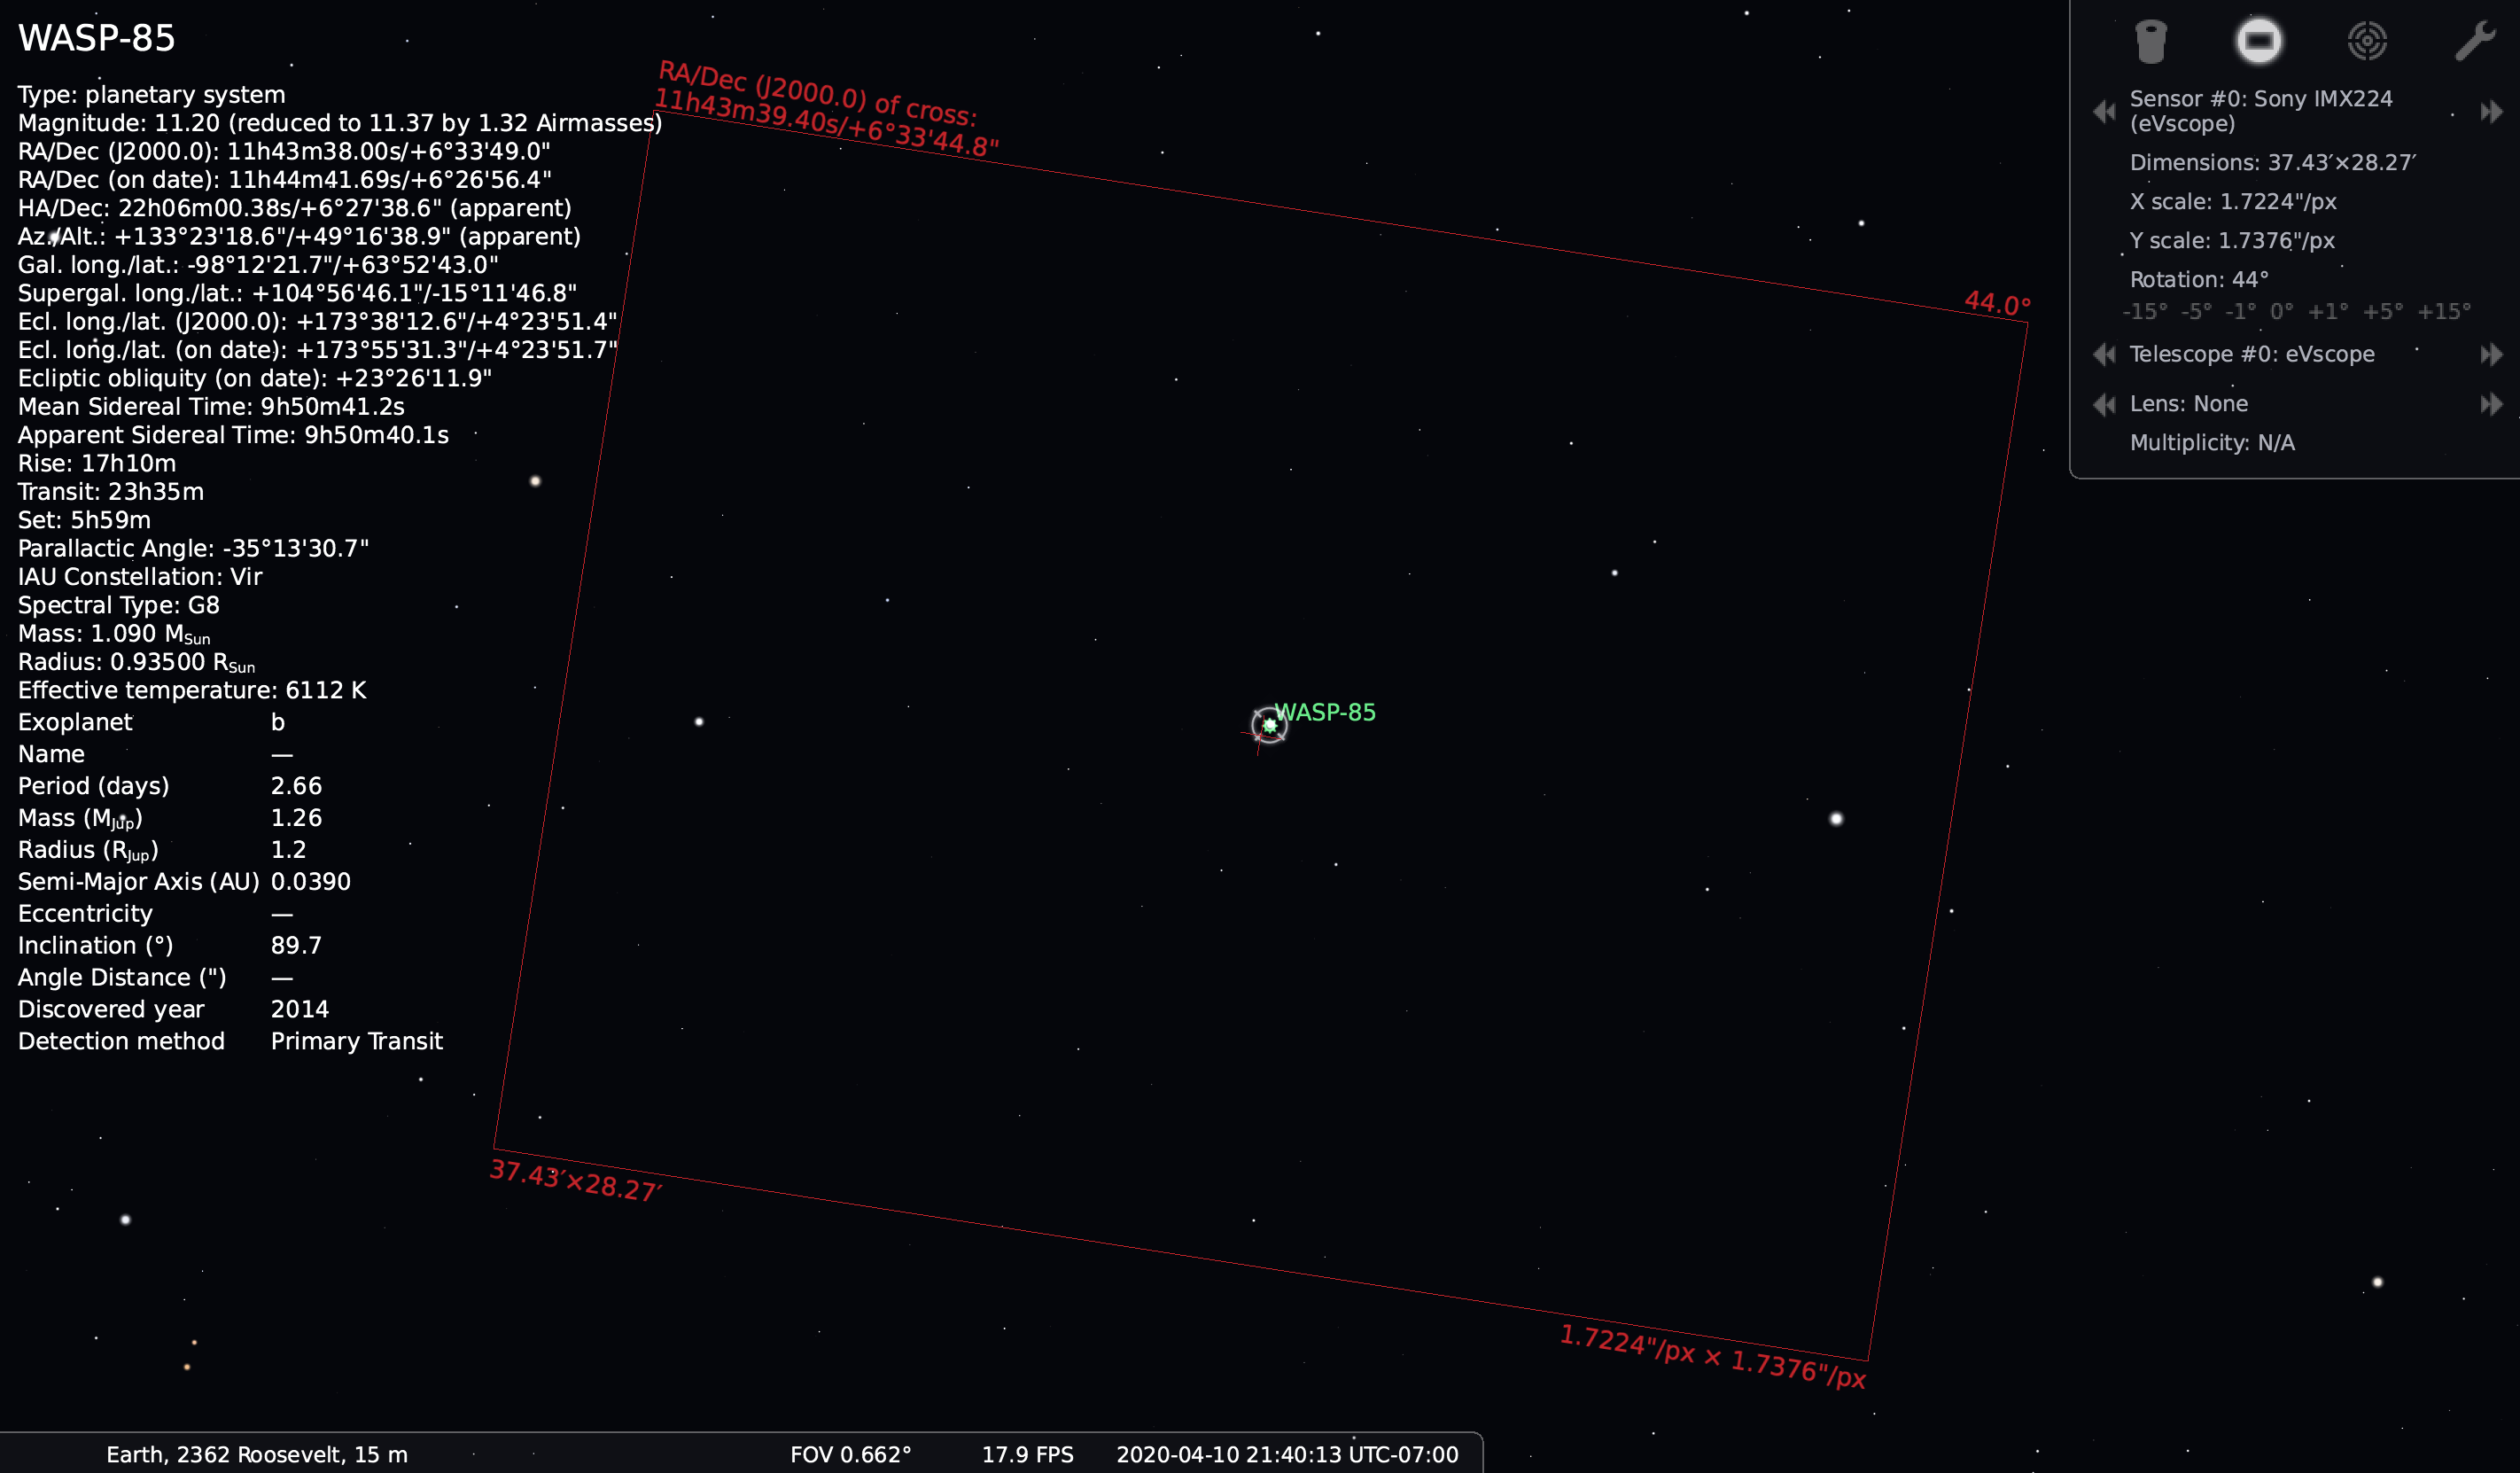
WASP-85 2020-04-11 finder chart. Target star is in reticle.
USA Target: Best viewed from western United States, but possible in the east.
Saturday, April 11, 2020
Exoplanet Observation Details –> WASP-107 b
Date(s) of observation:
Saturday, April 11, 2020
Observation Start/End Time:
9:41 pm – 1:51 am, Pacific Standard Time
*Hey, guess what? You don’t even have to be with your eVscope this entire time! I’ve done observations this long and after setting up went inside to catch up on my favorite show or enjoyed some reading.
IMPORTANT: PLEASE CHECK THE WEATHER so if you leave your eVscope out it is not damaged by rain/snow!!!
Target:
WASP-107 b
Additional details: V=11.4, Depth (ppt) = 20.9
We hope to detect exoplanet, WASP-107 b
Celestial Coordinates:
Right Ascension (RA) –> 12:33:32.85
Declination (Dec) –> -10:08:46.1
Additional Target Information:
Constellation: Virgo
Direction: SE
Elevation at Start/Mid/End of Transit: 33°/41°/42°
eVscope Settings:
Exposure: 3950 ms
Gain: 20 db
FOV Finder Chart:
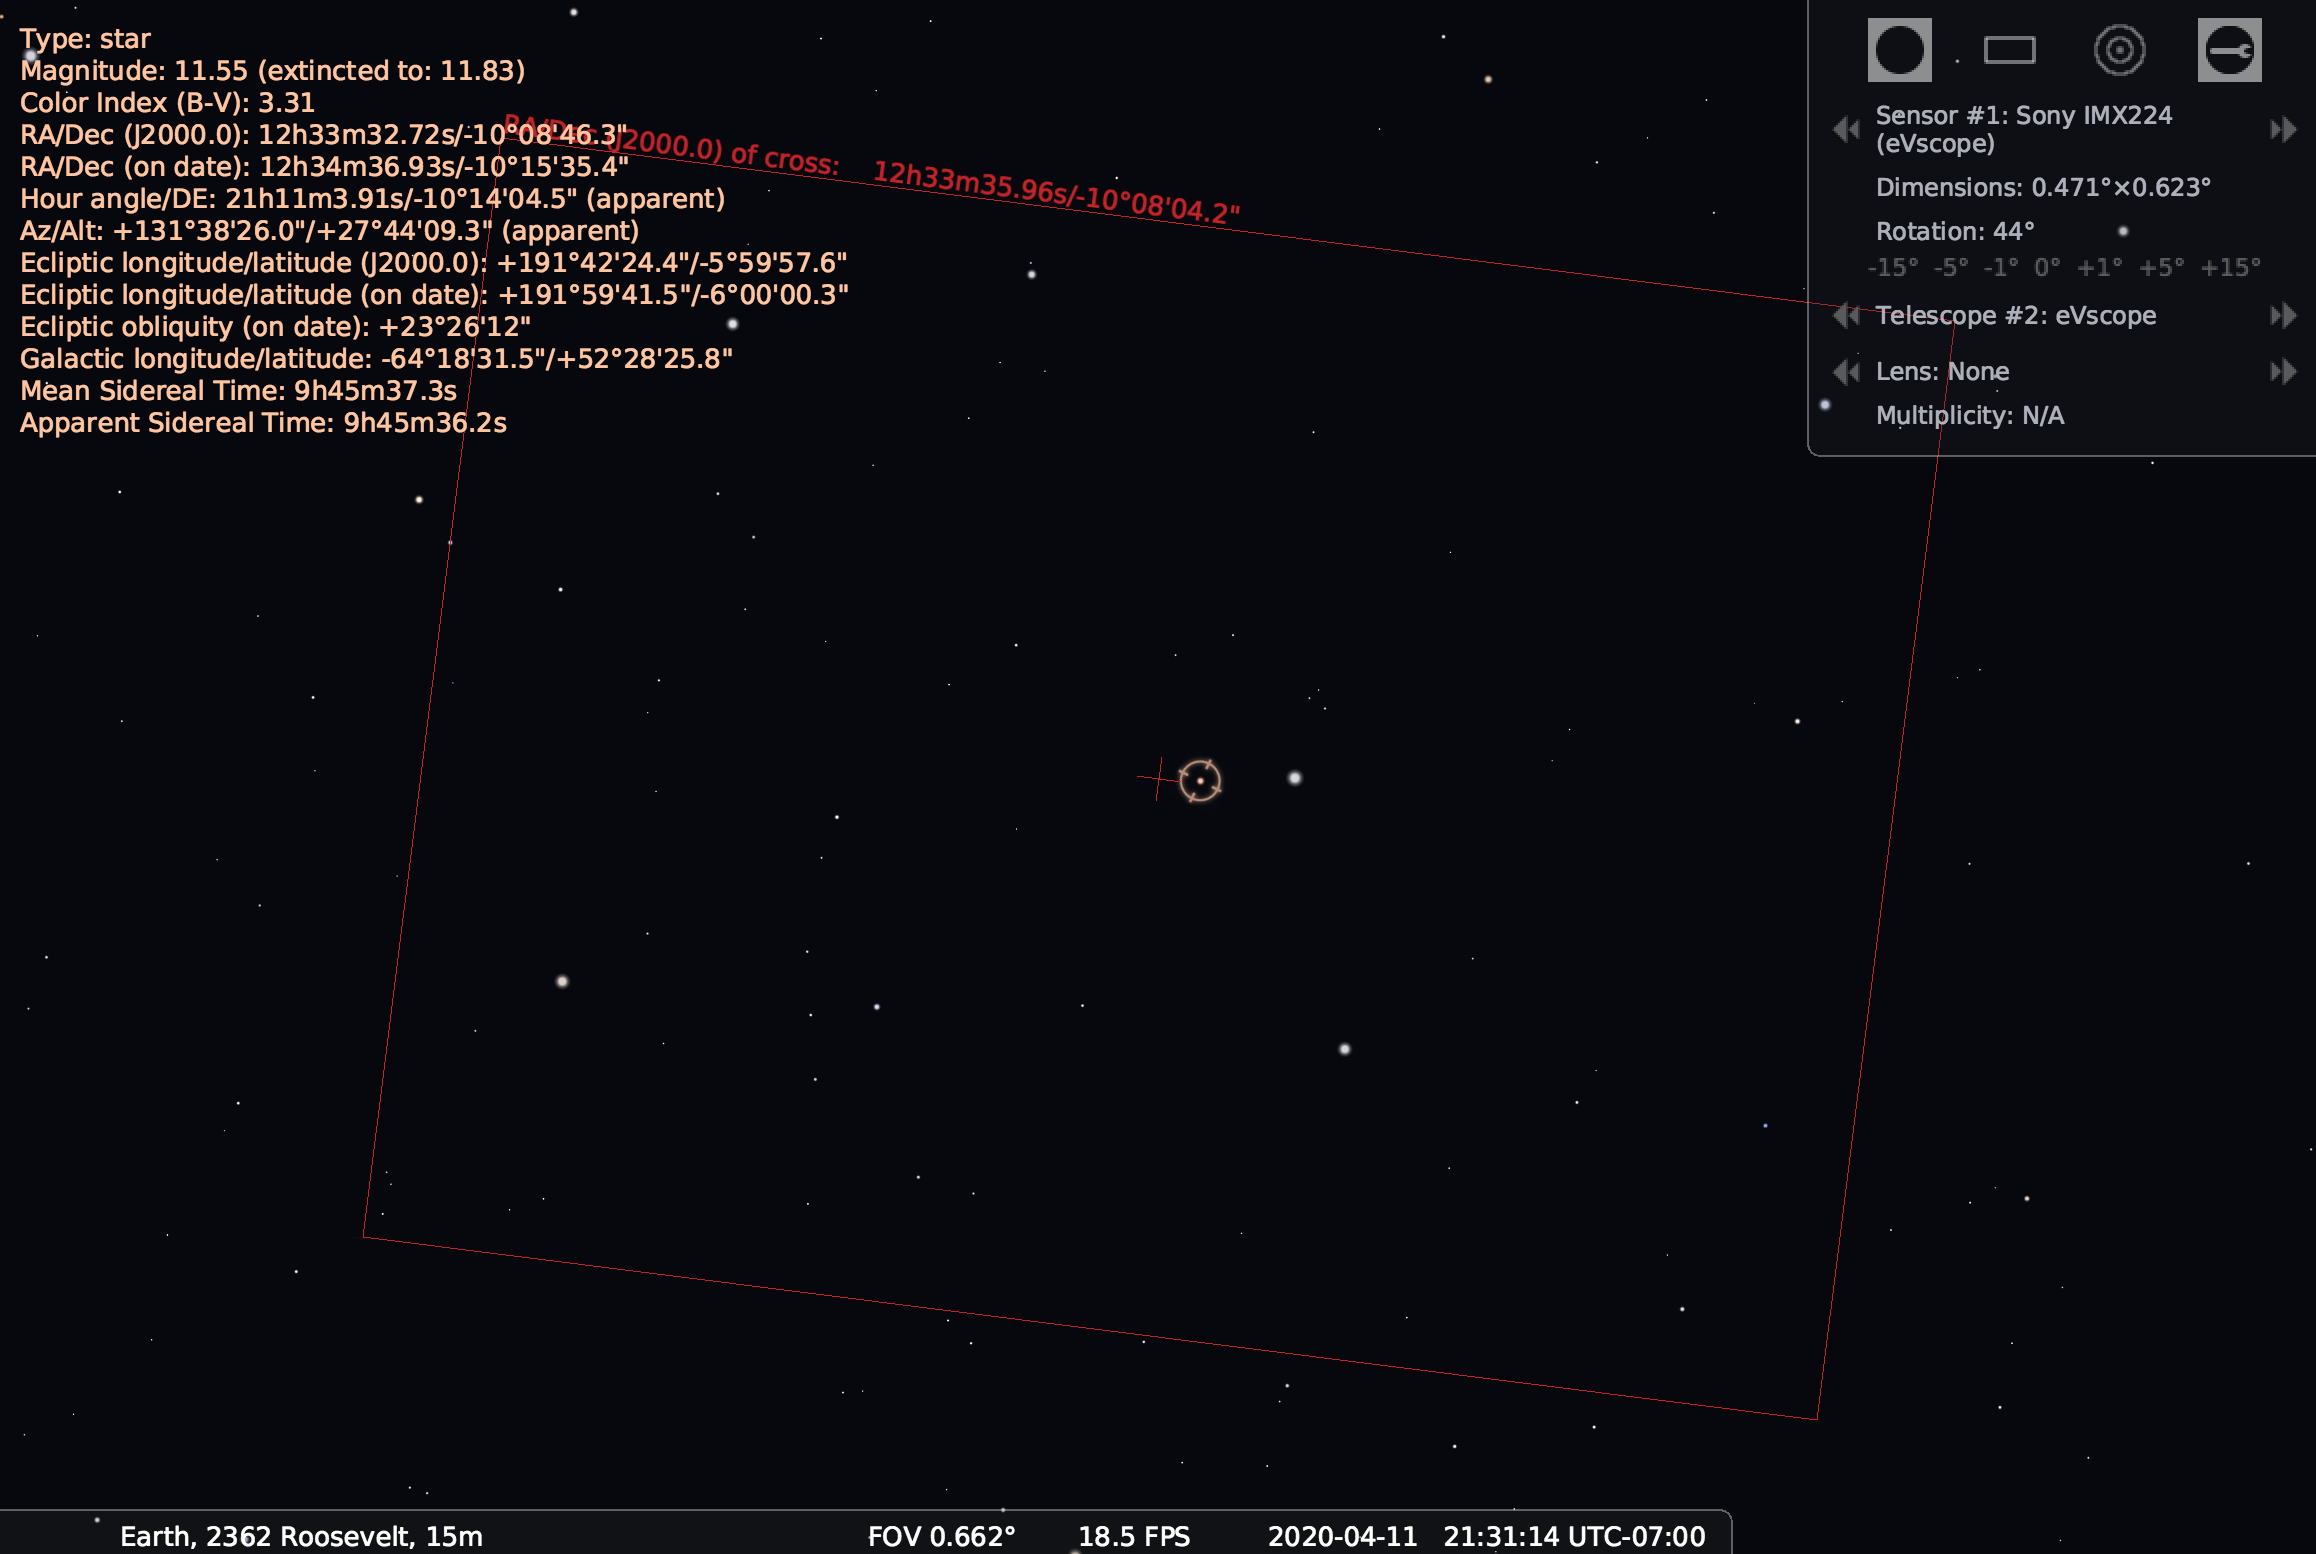
WASP-107 2020-04-11 finder chart. Target star is in reticle.

This is our new science goal for my PhD to use Unistellar eVscopes to find Baby Yoda! Lucasfilm/Walt Disney Pictures via Disney+


